1. Introduction to ReFrame-HPC and initial benchmark setups
- What you will learn in this course
-
-
The basics of ReFrame-HPC
-
How to run a simple benchmark using feelpp.benchmarking
-
How to create figures to visualize benchmarking results, using feelpp.benchmarking
-
1. Overview of ReFrame-HPC and feelpp.benchmarking
1.1. What is feelpp.benchmarking ?
feelpp.benchmarking is a framework designed to automate and facilitate the benchmarking process for any application. It is built on top of ReFrame-HPC, and was conceived to simplify benchmarking on any HPC system. The framework is specially useful for centralizing benchmarking results and ensuring reproducibility.

1.1.1. Motivation
Benchmarking an HPC application can often be an error-prone process, as the benchmarks need to be configured for multiple systems. If evaluating multiple applications, a benchmarking pipeline needs to be created for each one of them. This is where feelpp.benchmarking comes in hand, as it allows users to run reproducible and consistent benchmarks for their applications on different architectures without manually handling execution details.
The framework’s customizable configuration files make it adaptable to various scenarios. Whether you’re optimizing code, comparing hardware, or ensuring the reliability of numerical simulations, feelpp.benchmarking offers a structured, scalable, and user-friendly solution to streamline the benchmarking process.
1.1.2. How it works
The framework requires 4 configuration files, in JSON format, in order to set up a benchmark.
- 4 configuration files
-
- System settings (ReFrame)
-
Describes the system architecture (e.g. partitions, environments, available physical memory, devices)
- Machine Specifications
-
Filters the environments to benchmark, specifies access, I/O directories and test execution policies.
- Benchmark/Application Specifications
-
Describes how to execute the application, where and how to extract performance variables, and the test parametrization.
- Figure configuration
-
Describes how to build the generated report’s plots
Once the files are built and feelpp.benchmarking is launched, a pre-processing phase begins where configuration files are parse. After this, the ReFrame test pipeline is executed according to the provided configuration.
- Pre-processing stage
-
-
Configuration files are parsed to replace placeholders.
-
If a container image is being benchmarked, this one is pulled and placed on the provided destination.
-
If there are remote file dependencies, they are downloaded to the specified destinations.
-
- ReFrame test pipeline
-
-
The parameter space is created.
-
Tests are dispatched.
-
Computing resources are set, along with specific launcher and scheduler options.
-
Jobs are submitted by the scheduler.
-
Performance variables are extracted.
-
Sanity checks
-
Cleanup
-
Finally, at the end phase of the pipeline, feelpp.benchmarking will store the ReFrame report following a specific folder structure. This will allow the framework to handle multiple ReFrame reports in order to render them in a dashboard-like website.
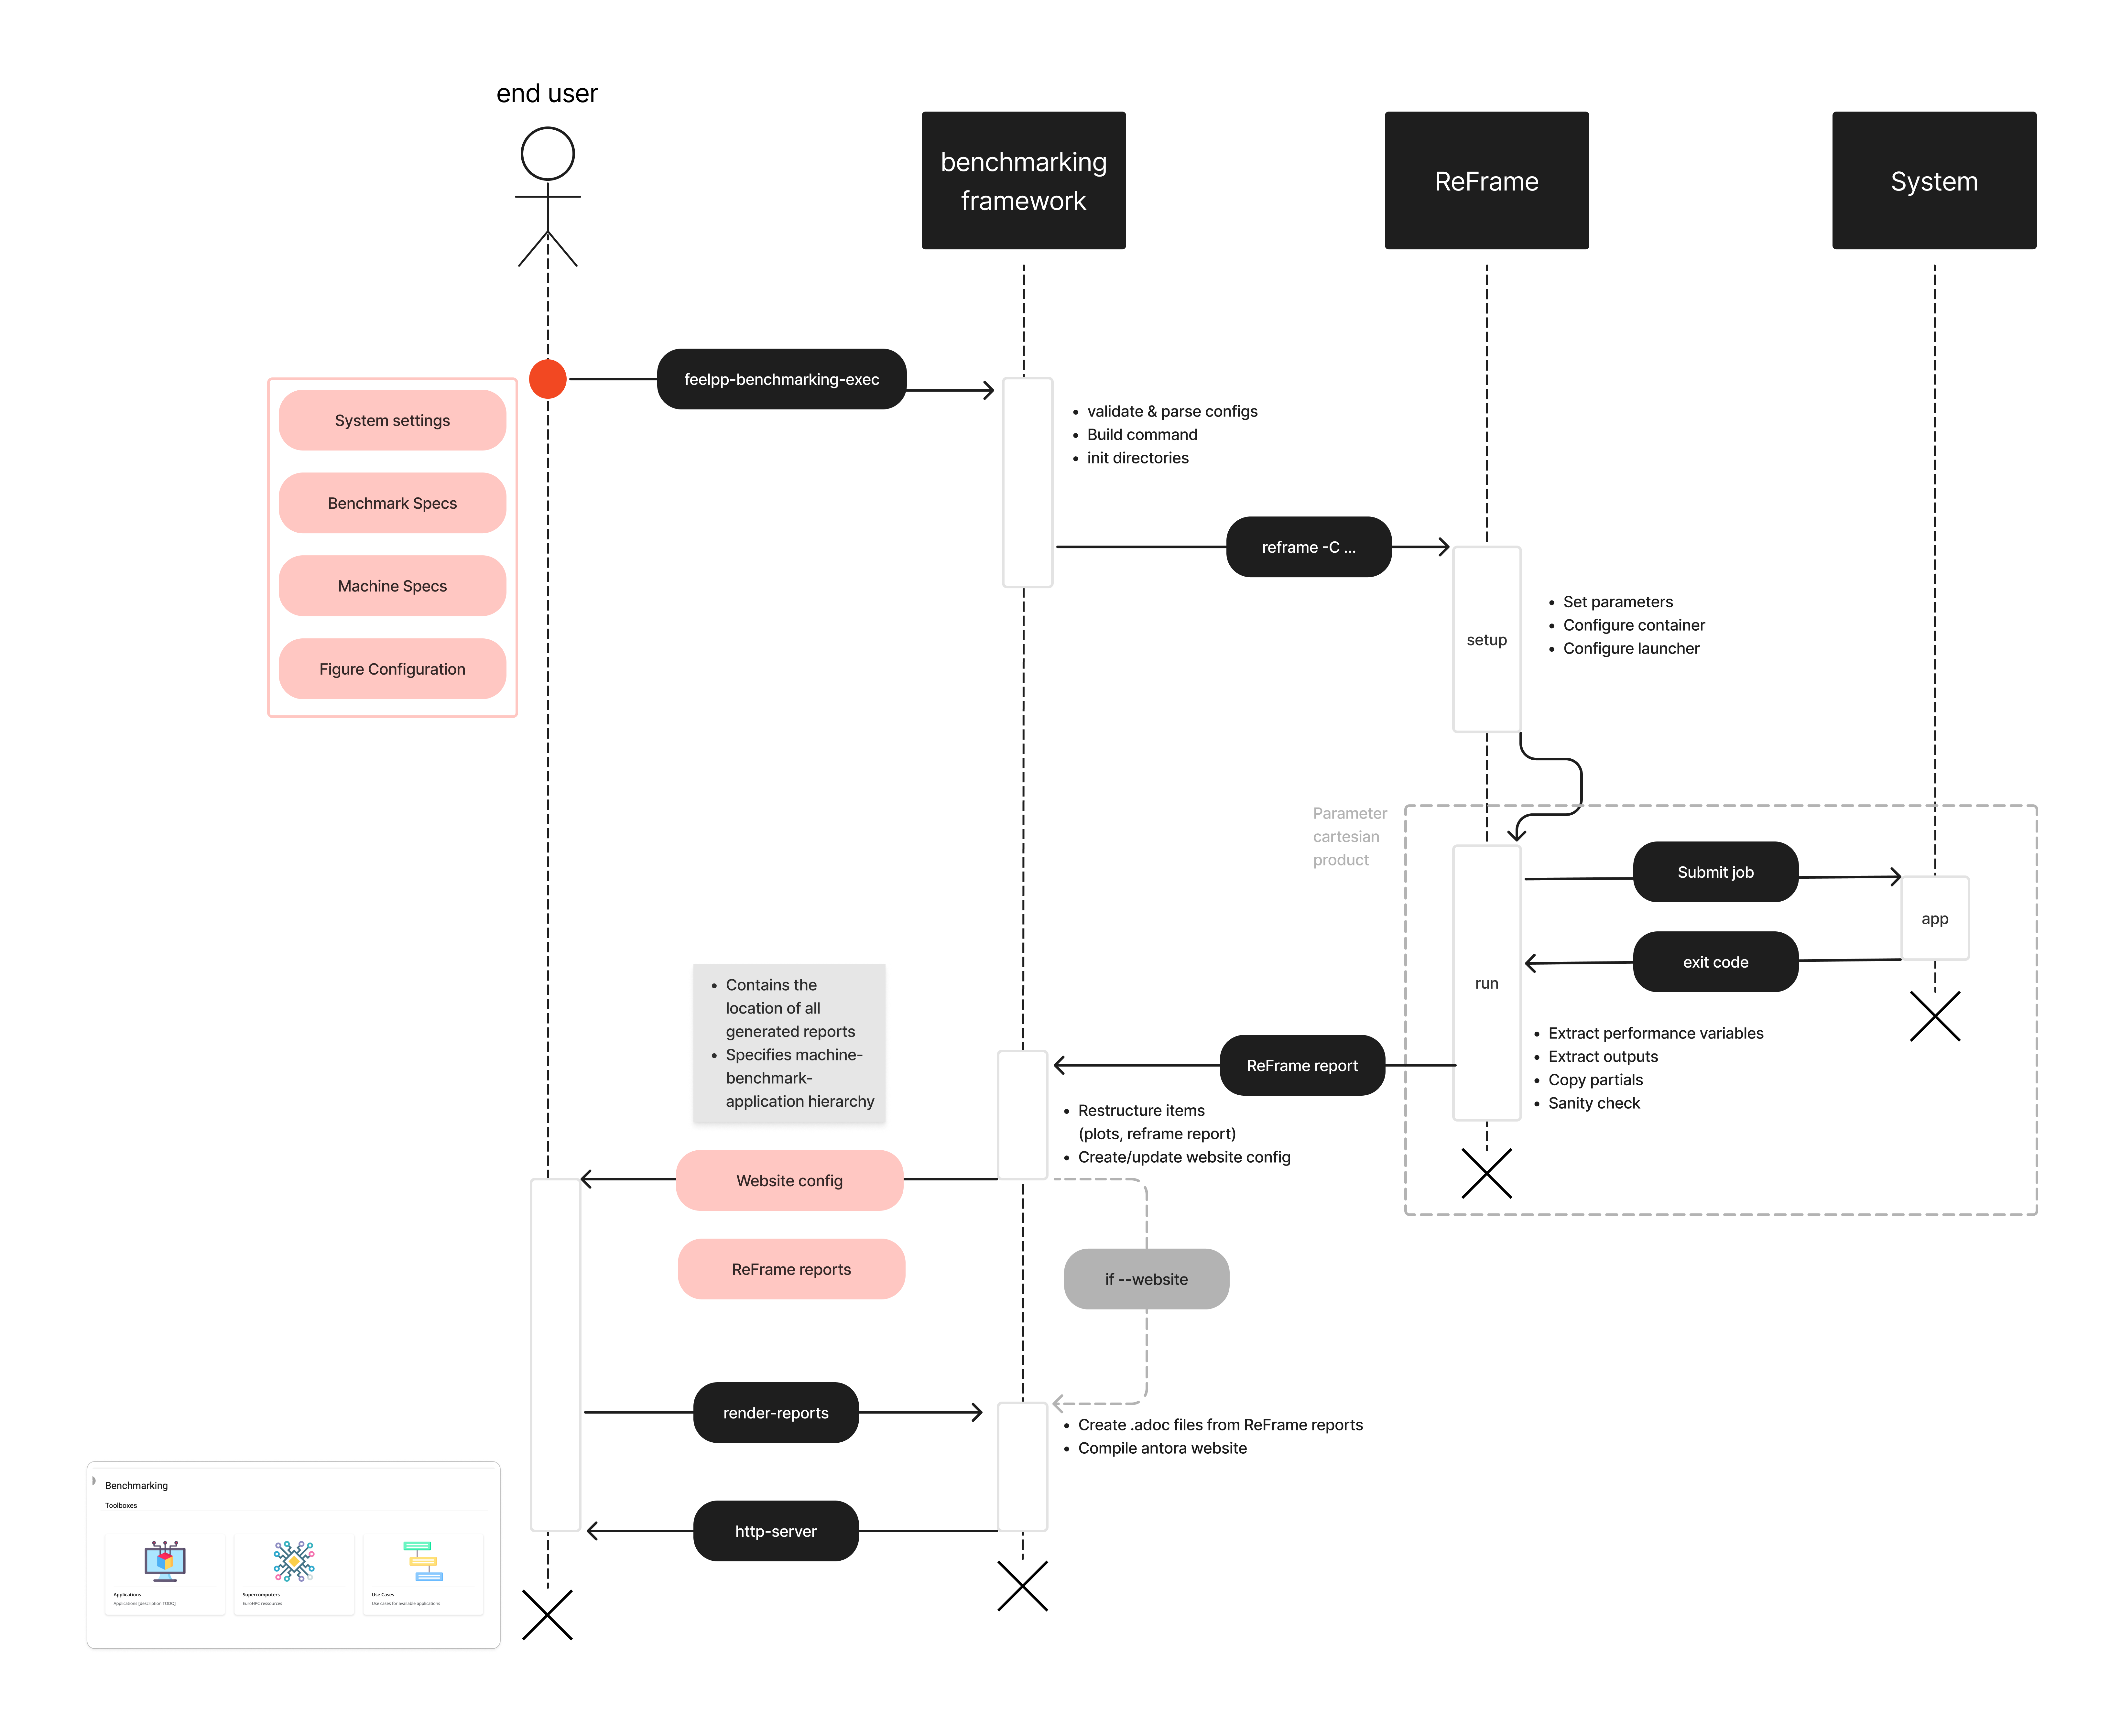
The diagram figure summarizes the feelpp.benchmarking workflow.

1.2. What is ReFrame-HPC ?

ReFrame is a powerful framework for writing system regression tests and benchmarks, specifically targeted to HPC systems. The goal of the framework is to abstract away the complexity of the interactions with the system, separating the logic of a test from the low-level details, which pertain to the system configuration and setup. This allows users to write portable tests in a declarative way that describes only the test’s functionality.
1.2.1. Core features
- Regression testing
-
Ensures that new changes do not introduce errors by re-running existing test cases.
- Performance evaluation
-
Monitors and assesses the performance of applications to detect any regressions or improvements.
- Performance and Sanity checks
-
Automates validation of test results with built-in support for performance benchmarks, ensuring correctness and efficiency.
1.2.2. Test Execution Pipeline
ReFrame tests go through a pre-defined pipeline where users can customize the what happens in between each step by using decorators (e.g. @run_after("setup")).
-
Setup: Tests are set up for current partition and programming environment.
-
Compile: If needed, the script for test compilation is created and submitted for execution.
-
Run: Scripts associated to the test execution are submitted (asynchronously or sequentially).
-
Sanity: The test outputs are checked to validate the correct execution.
-
Performance: Performance metrics are collected.
-
Cleanup: Test resources are cleaned up.
For those interested in learning more, check out:
-
Official ReFrame Documentation: reframe-hpc.readthedocs.io
-
GitHub Repository: github.com/reframe-hpc
2. ReFrame’s System Configuration File
feelpp.benchmarking makes use of ReFrame’s Configuration files to set up multiple HPC systems.
These files describe the system’s architecture, as well as the necessary modules, partitions, commands and environments for your applications to run as expected.
System configuration files can be provided as a JSON file, or as a Python script where the configuration is stored as a dictionary in a variable named site_configuration.
- Built-in supercomputers config
-
-
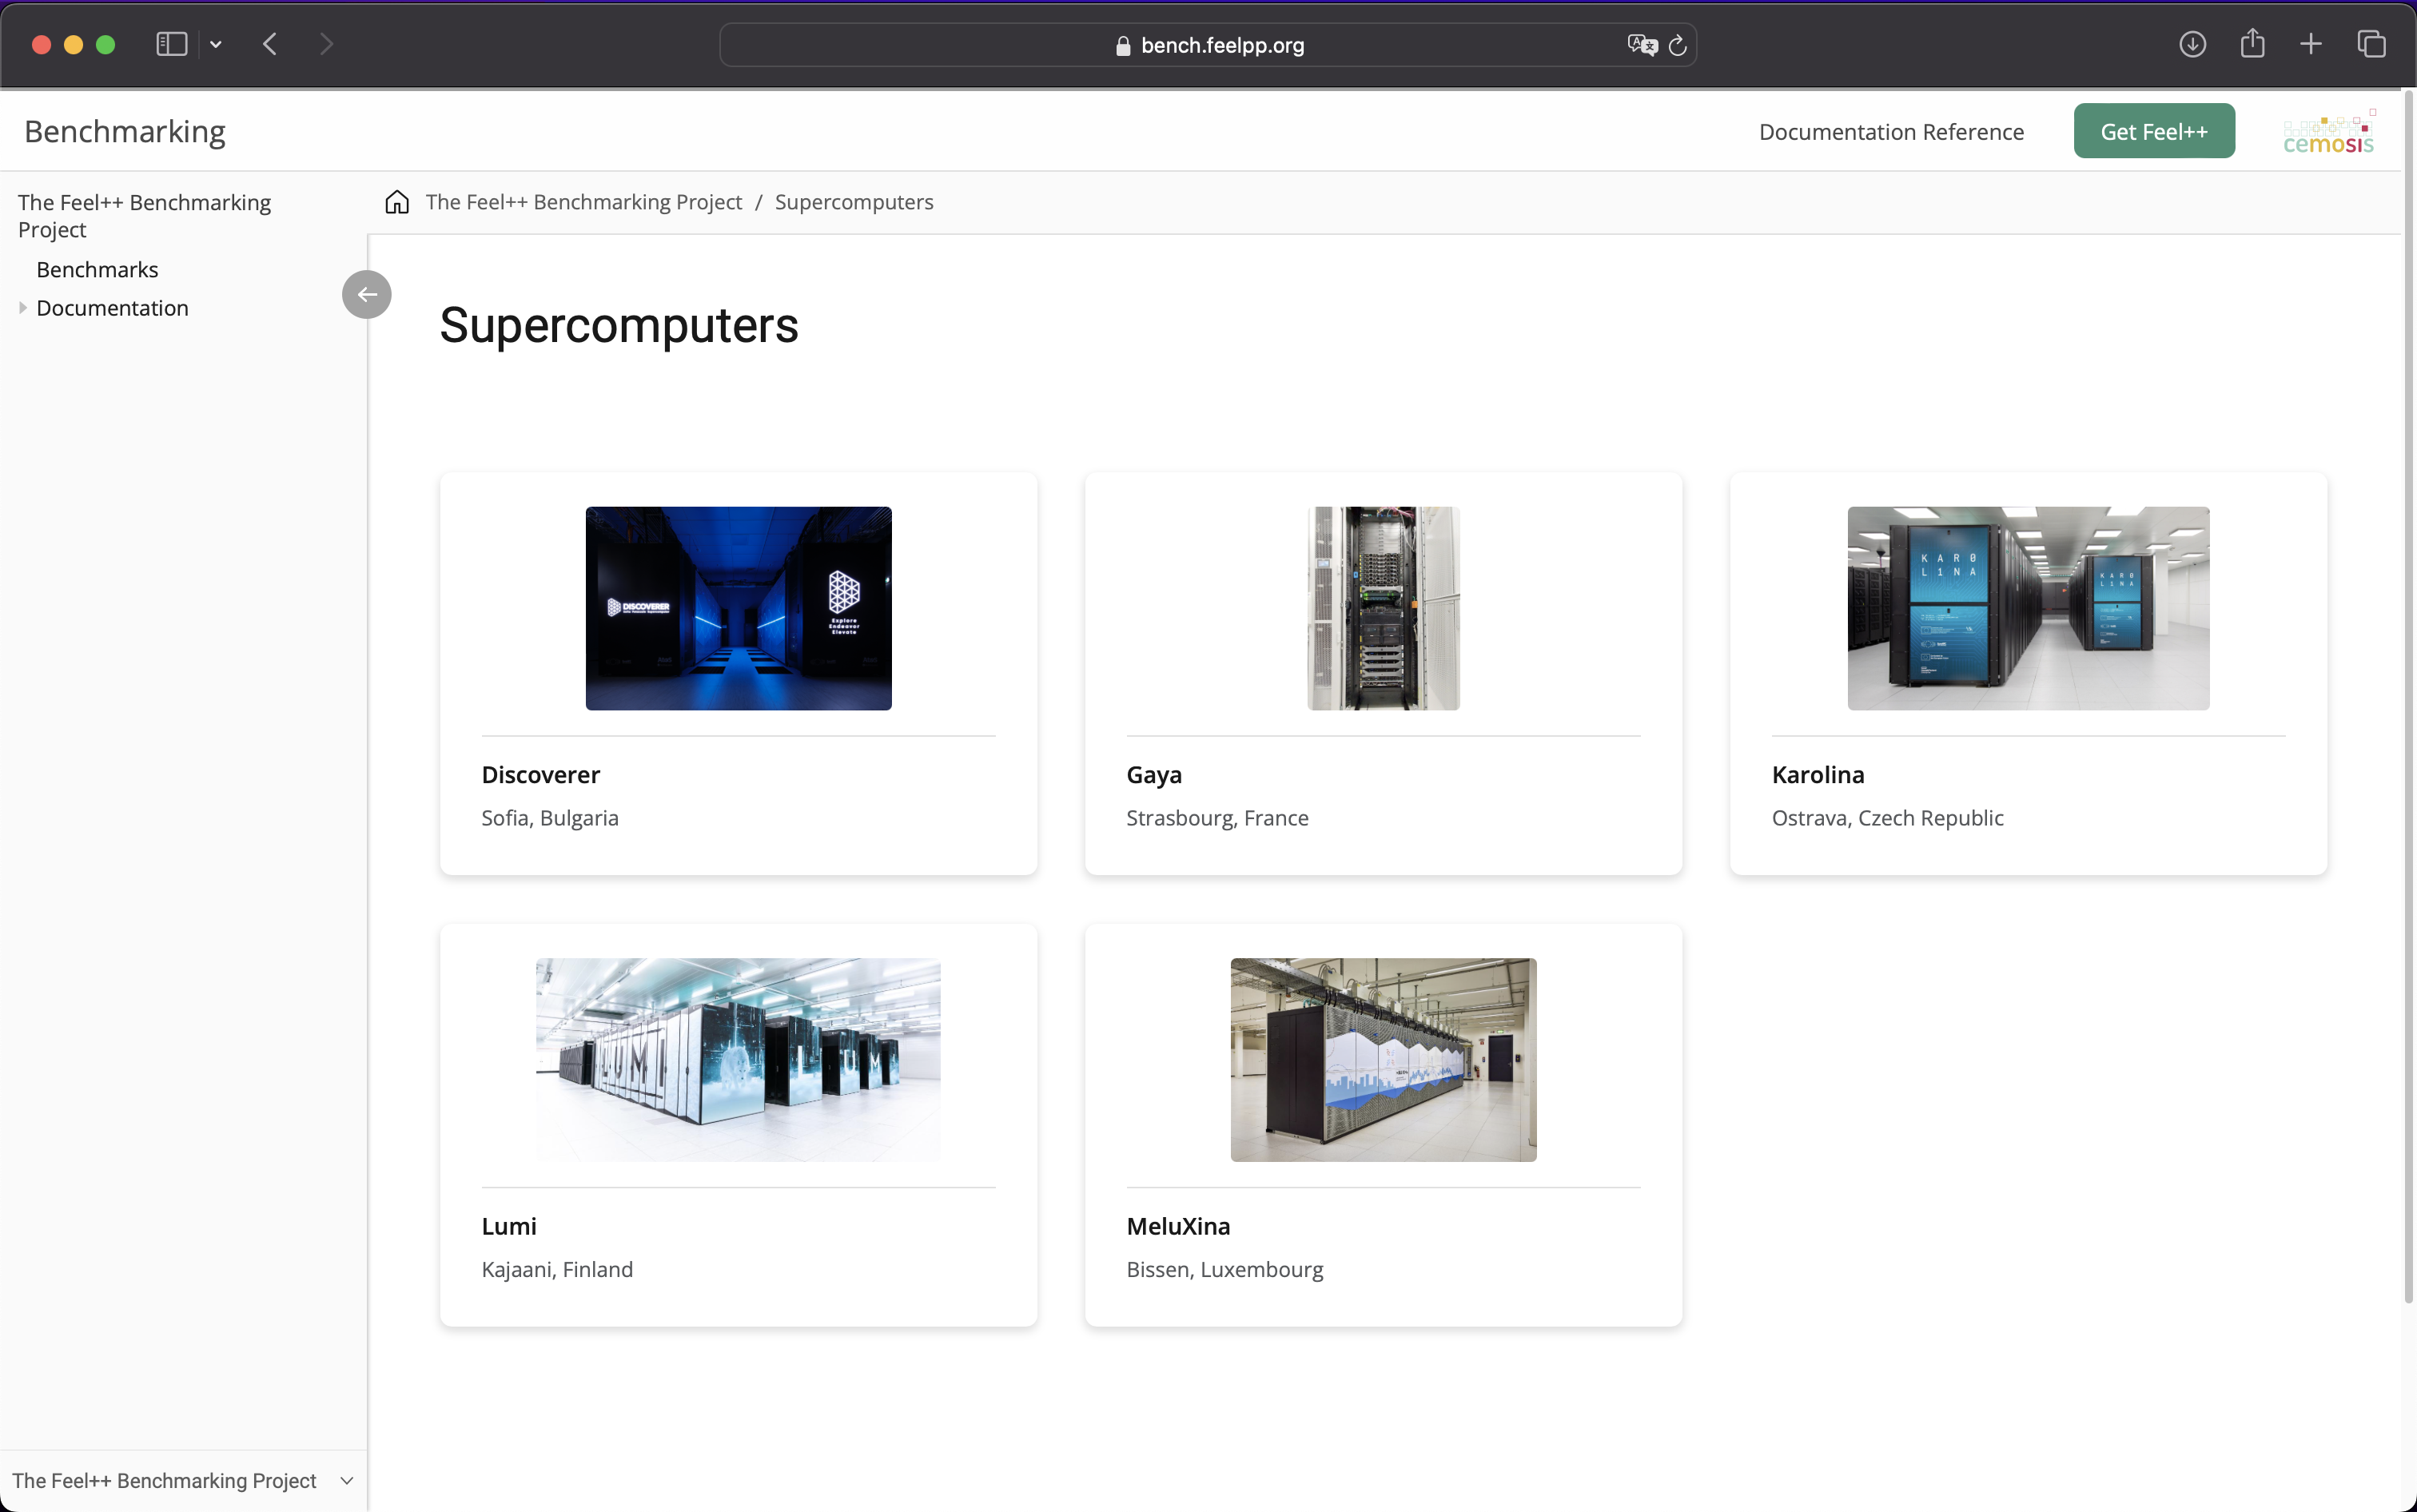
Discoverer. Sofia, Bulgaria.
-
Vega. Maribor, Slovenia.
-
MeluXina. Bissen, Luxembourg.
-
Karolina. Ostrava, Czechia.
-
Gaya. Strasbourg, France.
-
LUMI. Kajaani, Finland. [SOON]
-
|
There is no need to write system configurations for built-in systems. Users can specify them directly on the machine specification JSON. |
2.1. System partitions and Environments
According to ReFrame’s documentation, "a system is an abstraction of an HPC system that is managed by a workload manager. A system can comprise multiple partitions, which are collection of nodes with similar characteristics". And "an environment is an abstraction of the environment where a test will run and it is a collection of environment variables, environment modules and compiler definitions".
Karolina has defined a qcpu partition consisting of 720, and a qgpu partition consisting of 72 nodes equiped with GPU a accelerator. The entire list of Karolina’s partitions can be found here.
Now, a user might define a programming environment that uses Python3.8, and another environment that uses Python3.13.
2.2. System specific parameters
It can be useful to specify some configurations, like the maximum number of jobs that can be submitted asynchronously, additional launcher options, or the available memory per node.
|
feelpp.benchmarking requires to set the |
3. Machine Specification File
When benchmarking an application, users must tell feelpp.benchmarking in which system the tests will run. To do this, a machine specification JSON file should be provided.
This configuration file will not only filter partitions and environments for the tests, but also specifies access to the target systems (if needed). Users can also specify some input and output directories path that are common for all benchmarked applications.
|
Thanks to feelpp.benchmarking's {{placeholder}} syntax, multiple configuration fields can be refactored inside this file. |
4. Example: Benchmarking the time complexity of sorting algorithms
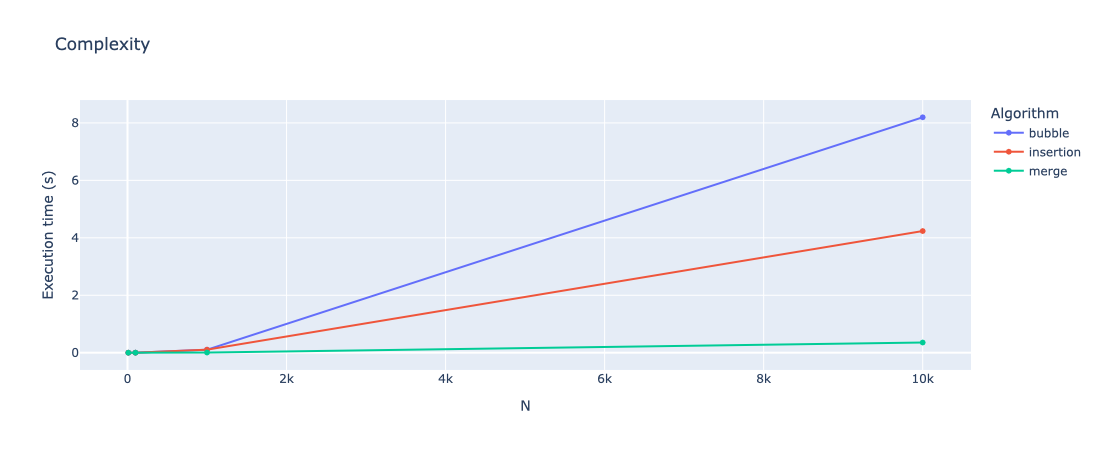
To exemplify what feelpp.benchmarking can do, a good test case is to benchmark the time complexity of sorting algorithms.
The framework provides an example python application that sorts a random list of integers using different sorting algorithms. This application takes the following arguments:
-
-n: the number of elements in the list to sort -
-a: The algorithm to use for sorting. Options arebubble,insertion,merge -
-o: The output file to write execution time. It will be written in JSON format ({"elapsed": 0.0})
This example can be recreated with the following python code:
- Bubble sort
def bubbleSort(array):
    n = len(array)
    is_sorted = True
    for i in range(n):
        for j in range( n - i - 1 ):
            if array[j] > array[j+1]:
                array[j],array[j+1] = array[j+1], array[j]
                is_sorted = False
        if is_sorted:
            break
return array- Insertion sort
def insertionSort(array):
    n = len(array)
    for i in range(1,n):
        key_item = array[i]
        j = i - 1
        while j>=0 and array[j] > key_item:
            array[j+1]=array[j]
            j-=1
        array[j+1] = key_item
return array- Merge sort
def merge(left,right):
    if not left:
        return right
    if not right:
        return left
    result = []
    left_i = right_i = 0
    while len(result) < len(left) + len(right):
        if left[left_i] <= right[right_i]:
            result.append(left[left_i])
            left_i+=1
        else:
            result.append(right[right_i])
            right_i+=1

        if right_i == len(right):
            result += left[left_i:]
            break

        if left_i == len(left):
            result += right[right_i:]
            break

    return result


def mergeSort(array):
    if len(array) < 2:
        return array
    mid = len(array) // 2
    return merge( left = self.sort(array[:mid]), right=self.sort(array[mid:]) )
Then, the main function that parses the arguments and calls the sorting algorithm can be defined as follows:
- Main function
from argparse import ArgumentParser
from time import perf_counter
import numpy as np
import os, json

if __name__=="__main__":
    #Parse the arguments
    parser = ArgumentParser()
    parser.add_argument('-n',help="Number of elements")
    parser.add_argument('--algorithm','-a', help="Sorting algorithm to use")
    parser.add_argument('--out','-o', help="Filepath where to save elapsed time")
    args = parser.parse_args()

    #Generate a random list of integers
    n = int(float(args.n))
    array = np.random.randint(min(-1000,-n),max(1000,n),n).tolist()

    #Select the sorting algorithm
    if args.algorithm == "bubble":
        alg = bubbleSort
    elif args.algorithm == "insertion":
        alg = insertionSort
    elif args.algorithm == "merge":
        alg = mergeSort
    else:
        raise NotImplementedError(f"Sorting algorithm - {args.algorithm} - not implemented")

    #Sort the array and measure the elapsed time
    start_time = perf_counter()
    sorted_array = alg(array)
    end_time = perf_counter()
    elapsed_time = end_time - start_time

    #Create the folder if it does not exist
    folder = os.path.dirname(args.out)
    if not os.path.exists(folder):
        os.makedirs(folder)

    #Save the elapsed time
    with open(args.out,'w') as f:
json.dump({"elapsed": elapsed_time},f)|
At the moment, feelpp.benchmarking only supports extracting performance metrics from JSON and CSV files. Very soon, extracting metrics from stdout and plain text files will be supported, using regular expressions. |
5. Benchmark Specification File
This configuration file describes precisely what will be benchmarked. It is used to specify the parameter space for the benchmarking process, the application executable and its arguments, as well as where to find performance variables and how to validate tests.
The basic skeleton of the JSON file is the following:
{
    //A given name for your Use Case
    "use_case_name":"my_use_case",

    //The maximum time the submitted job can run. After this, it will be killed.
    "timeout":"0-0:5:0",

    //Where to find the application.
    "executable":"my_app.sh",

    // Application options
    "options": ["-my-flag","--my-option=1"],

    // How many computational resources to use for the benchmark, and how
    "resources": {},

    // Performance values extraction
    "scalability": {},

    // Check if test succesfull
    "sanity":{},

    // Test parametrization
    "parameters":[]
}
5.1. Magic strings
feelpp.benchmarking is equiped with a special {{placeholder}} syntax that replaces values from a json field into another. This syntax is specially helpful for refactoring the configuration file. However, the main objective of this syntax is to access values assigned during the test, like parameter values or the test ID. It is also possible to access values from the machine specifications file.
5.2. Parameters
The parameter field consists of a list of Parameter objects that contain the values for which the test will be executed.
It must be noted that ReFrame will consider the cartesian product of the parameters list in order to launch the tests.
The framework is equiped with multiple parameter generators that simplifies having to manually specify all desired parameters. For example, users can provide a range or a linspace function.
Finally, parameter values can be accessed -on the go- by other configuration fields by using the placeholder syntax and appending the reserved keyword .value. i.e.
"{{parameters.my_param.value}}".
5.3. Application setup
The executable and options fields specify the command that will be executed for the benchmark. The executable defines the application or script to run, while the options array contains command-line arguments passed to it. Users can use placeholders to reference parameters or system variables dynamically.
5.4. Resources
Users can specify the computing resources for which the tests will run, and can even parametrize this.
A combination of (tasks, tasks_per_node, gpus_per_node, nodes, memory and exclusive_access) can be specified. However, only certain combinations are supported, and at least one must be provided.
5.5. Performance Values Extraction
The scalability field defines how performance metrics are extracted from output files. Users first need to specify the base directory where performance variables are written. Then, users should provide the list of all the performance files, along with the file format. For JSON files, a variables_path field should be passed indicating how to extract the variables from the dictionary structure.
| At the moment supported formats are : CSV and JSON |
Wildcards (*) are supported for extracting variables from deeply nested or complex JSON structures.
|
5.6. Test validation
The sanity field is used to ensure the correct execution of a test. It contains two lists: success and error. The framework will look for all text patterns in the success list and will force the test to fail if the patterns are not found.
Analogously, tests will fail if the patterns in the error list are found.
| Only validating the standard output is supported for now. |
5.6.1. Full Example Configuration File
The full configuration file for a sorting algorithms benchmark can be found below:
{
"use_case_name": "sorting",
"timeout":"0-0:5:0",
"output_directory": "{{machine.output_app_dir}}/sorting",
"executable": "python3 {{machine.input_dataset_base_dir}}/sorting/sortingApp",
"options": [
"-n {{parameters.elements.value}}",
"-a {{parameters.algorithm.value}}",
"-o {{output_directory}}/{{instance}}/outputs.json"
],
"resources":{ "tasks":1, "exclusive_access":false },
"scalability": {
"directory": "{{output_directory}}/{{instance}}/",
"stages": [
{
"name":"",
"filepath": "outputs.json",
"format": "json",
"variables_path":"elapsed"
}
]
},
"sanity": { "success": [], "error": [] },
// Test parameters
"parameters": [
    {
        "name": "algorithm",
        "sequence": [ "bubble", "insertion", "merge" ]
    },
    {
        "name":"elements",
        //Equivalent to [10,100,1000,10000]
        "geomspace":{
            "min":10,
            "max":10000,
            "n_steps":4
        }
    }
]
}6. Figure specifications
The final configuration file that must be provided to the feelpp.benchmarking framework is the plot specifications file. This file contains the information necessary to generate the plots that will be displayed in the report.
It has a flexible syntax that allows users to build figures depending on the benchmark parameters.
The file should contain a single field: plots, which is a list of Plot objects.
The figures will appear in the report in the order they are defined in the file.
Users should specify the plot type and which data to use for different axis.
Additionally, a transformation field can be provided to apply a transformation to the data before plotting. For example, users can apply a speedup transformation.
|
Many plot types are supported. Some of them can take an arbitrary number of parameters by using the |
7. Launching the benchmarks
The feelpp-benchmarking-exec command is used to launch the benchmarks. The command is used as follows:
feelpp-benchmarking-exec --machine-config <machine-config> \
                            --benchmark-config <benchmark-config> \
                            --plots-config <plots-config> \
                            --custom-rfm-config <custom-rfm-config>
Additionally, the -v flag can be used to increase the verbosity, the --dry-run flag can be used to simulate the execution and only generate scheduler scripts without submitting them, and the --website flag can be used to render the final reports and launch an http server to visualize the generated dashboard.
The feelpp-benchmarking-exec command will export the ReFrame performance reports, along with a snapshot of the plots configuration used for the current benchmark, and a website_config.json file that contains the information necessary to render the dashboard.
There is also a feelpp-benchmarking-render command that is used to render the dashboard using Asciidoc and Antora, from a given website configuration, into a specified modules directory. Using this command allows to tweak figures and the dashboard layout, without having to re-run the benchmarks.
| There are a ton of powerful features of feelpp.benchmarking that were not mentioned in this course, they will be mentioned on the advanced training session, such as working with containers, pruning the parameter space and handling memory (or other) constraints. |
 .pdf
.pdf
